Timber flooring DIY
 Materials required:
- PVC glue
- Measuring tape
- hammer
- Craft knife
- Drop saw / mitre saw / table saw
- tapping block
- ‘Z’ metal pull bar
- Plastic spacers
Building Materials
- Floor board timber (floating floorboards)
- Insulation foam underlay (with silver backing)
- Aluminium edging for joining carpet to the timber floor
- Duct tape
Installation steps
First of all, you will need to measure the coverage area, calculate the total size of the area, and purchase the timber planks to suit, be sure to always get 10% more than required, as you could make mistakes cutting.
Tip: After purchasing, place the timber in the room you are going to lay the timer, this will help the timber expand and adjust to that room condition.
 If you have existing carpet, you will need to carefully trim it out using a sharp craft knife. Ripping off the carpet will expose the carpet underlay.
I was hoping to savage this underlay, as it is still in good condition, but this is a quite thick and spongy, the floor boards would have too much room for movement, so at the end I decided to rip this out.
 The carpet & underlay are carefully removed, rolled up and stored in the garage, as I am putting this up for sale on trademe. Now trademe is a great recourse when it comes to DIY, as ones junk could be someone elses treasure! I sold this for $40, it paid for the glues :)
You will need to make sure that the concrete is flat and clean, I thouroughly vacuum cleaned it before laying the foam underlay. The foam underlay can be easily purchased from your local hardware store, such as Bunnings or Placemakers.
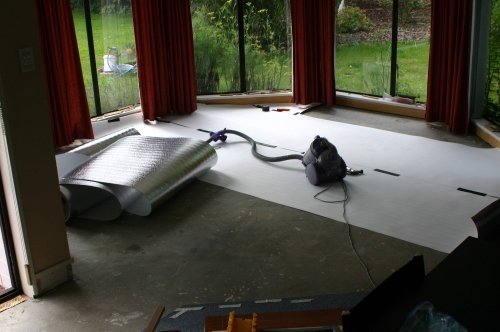 Photo on the left shows the underlay installed, I joined each piece with ducting tape. The foam is about 3mm, this helps even out slight uneven surfaces. I laid the silver side down, please ask the handyman at your hardware store first as I could be wrong? My logic tells me it is the silver side down, to block moisture.
The flooring planks can be installed as soon as the underlay is installed. The planks I purchased is the tongues and 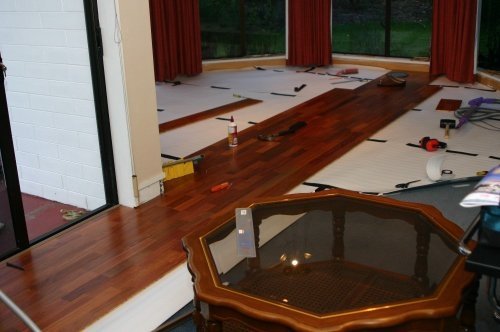 grooves, that inter locks together. This is the sort that you will require a bead of PVC glue for strong bonding. There are other types where you only require tapping together.
Tip: The planks should be installed with the tongue side against the wall. There should be at least 5mm space in between the wall and the boards to allow some movement.
A bead of PVC glue is applied to this particular flooring system, to ensure the joins are tight. The planks are tapped together using a plastic tapping block, please do not tap on the timber directly, as you can easily damage the edge. When you reach the wall, you will need to measure the length, and cut it with a drop saw (mitre saw).
The most tricky part in the installation process is when you reach the edge of the wall, and there is no way to tap. When this happens you will need a ‘pull bar’, this tool will help you pull the boards together. The pull bar is a ‘Z’ shaped 30cm long matal plate bar, one end clips onto the floorboard at the wall end, and the other end is for tapping. This is particularly useful, and a must have! $30, as a kit set (includes plastic spacer and a tapping block) at my hardware store.
Toe kick installation
I used the very same timber for the toe kicks at the edge of the wall, as this blends in nicely! and no extra cost involved. Simply measure the height required, then use a table saw to cut to size.
Timber floor and carpet edging strips installation
There are different types of edging, timber or aluminum. I chose aluminum for my project, as it is strong and looks nice. I tried the timber edging before and it cracked in high traffic area. I used an edging system supplied by Bunnings, it is particularly a smart system where you pre-drill holes on the ground, then slide the plastic plugs in under through the groove, and just lightly hammer them into the pre-drilled holes on the ground. It is really strong when plugged in. This plug can also be used for timber flooring. When installed, you can not see any screw holes and it looks fantastic!
Below is a gallery of all the photos I took
[smooth=id: 1; width:500; height:333; timed:true; arrows:true; carousel:true; links:false; info:true; align:left; frames:true; delay:9000; transition:fade; open:false; text:more;]