Installing WordPress on sub or root-folder?
kudesign website update
In order to keep a sparkling clean set of URLs, and SEO friendly, I have decided to change the permalinks structure of the kudesign site. In my previous configuration, each post had a long URL name: kudesign.co.nz/studio/2009/11/article-name/ This was due to the fact that my WP was installed inside a sub-folder, and not in the root directory.
Benefit of Clean URL
After a bit of research on Google, we found that it is best to keep a clean URL (e.g kudesign.co.nz/article-name). There are a few benefits for this:
- Easy to remember
- More secure
- Clean and efficient SEO (search engine optimization)
- Looks great and feels neat!
Should I install my WordPress on the Root-folder or Sub-folder?
Installing WP on the root directory can be messy, but installing on a sub-folder doesn’t give you a clean URL, so WP has a solution to make both worlds happy! It didn’t take long for me to find useful information on how to install your WordPress on a sub-folder, this method provided me with the correct path to what I wanted to achieve.
Before you start, read this
This operation needed to be carefully planned to prevent disaster! If you have a mature blog with hundreds or even thousands of articles, you don’t want to go ahead with this upgrade, as your entire site has already been indexed by major search engines, and you don’t want to be in the risk of losing all your search engine visitors! Luckily, we have just started, and the blog is still small.
Check your WordPress version for compatibility, this article is based on WordPress v2.8.6.
Changing your permalinks structure without getting 404 error page
I have just found out that even if you have a Godzilla size blog, you can still upgrade your permalinks structure! WordPress is just a beauty when it comes to plug-ins! When I typed in ‘permalink’ in the WP plug-ins search, bingo I saw just what I needed! The plug-in is called ‘Permalink Finder‘, author: Keith Graham, compatible up to WP v2.9. This plug-in basically looks for the name of your article, before throwing a 404 error page up on the screen. You can read more about it on Keith’s plug-in area. I installed and activated it, and all tests came back successfully! all my 404 pages had gone for good! Thank you so much Keith Graham!!
Related article: 3 WordPress Plugins to Safely Change Your Permalink Structure
Important: Google does not like page duplicates in your site, it is not recommended to upgrade your permalink structure if you have a large site, and please thoroughly research before action!
So what is the plan? Here are my steps:
Step 1: As always, backup your WP Database, and the entire website.
Step 2: Make yourself a cup of coffee, so stay sharp throughout the upgrade process.
Step 3: If you want to change the structure of your permalinks, please log-in to admin, go to Settings > Permalinks > and in the ‘Custom Structure’, type in /%postname%/ This will give you a set of very clean URLs.
![]()
Step 4:
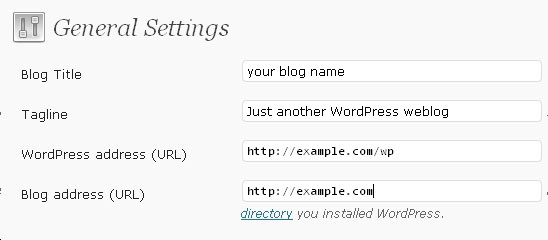
Log-in to admin, go to > Settings > General
- In the box for WordPress address (URL): this is the location of your wordpress install. Example: http://example.com/wp
- In the box for Blog address (URL): change the address to the root directory’s URL. Example: http://example.com
- Click Update
- Do not view the site just yet! You will probably see a page not found message, but don’t panic yet!

Step 5:
Move index.php and .htaccess out of the WP installed sub directory into the root directory. Note: some ftp client does not let you view the .htaccess file, check with your ftp software provider first! If you are using CuteFTP or WS_FTP, some info can be found here.
Step 6:
Edit index.php
Change the following and save the file. Change the line that says:
require(‘./wp-blog-header.php’);
to the following, using your directory name for the WordPress core files:
require(‘./wp/wp-blog-header.php’);
Note: ‘/wp’ is an example only, name this with the folder name you created for your WordPress install.
Step 7:
Log-in to your wordpress, for example: http://example.com/wp/wp-admin/
Go to Settings > Permalinks > and then click update.
Flush your browser cache, and visit your website. Check to see all your posts and pages appear correctly, if you have done this right, you should be able to see you have now a very clean set of URLs. It worked for me!